Checkpointing Jobs
Introduction
Some jobs may take many hours or even days to finish. If one of these jobs is interrupted or reaches a runtime limit, it could lose all of its progress and need to start over.
Checkpointing lets the job save its progress along the way, so it can continue from a saved point instead of restarting from the beginning.
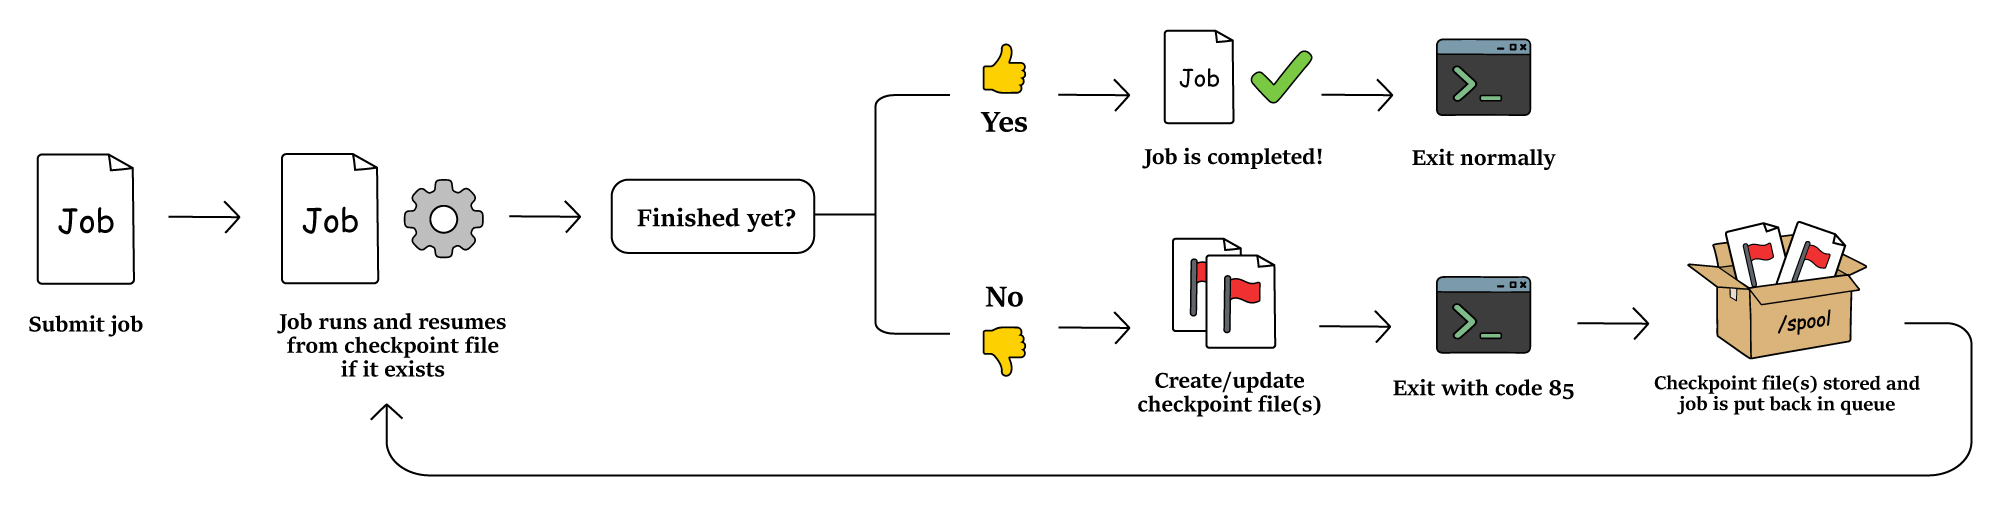
On the HTC system, this is especially useful for jobs that might exceed the 72-hour default runtime limit or are running on shared or backfill resources (e.g. want_campus_pools or want_ospool, +is_resumable), where a job may be evicted before it finishes.
This page explains how it works, whether your project is a good fit, and how to set it up.
Table of Contents
Try this example: Counting Fibonacci numbers
The example below walks you through the checkpointing process step-by-step. It shows how a program saves its progress, exits, and resumes from a checkpoint so you can apply the same ideas to your own project.
This example uses a Python script that calculates Fibonacci numbers over 10 iterations. It creates a checkpoint after every two completed iterations.
Step 1: Download script
Log in to your CHTC account through the terminal and download the example script:
wget https://chtc.cs.wisc.edu/uw-research-computing/files/fibonacci.py
Confirm that the file was downloaded:
ls
You should see:
fibonacci.py
Step 2: Make the script executable
Before you can run the script directly, give it permission to execute:
chmod +x fibonacci.py
Step 3: Create a submit file
Create a submit file named fibonacci.sub. This example uses nano but you can use any text editor you prefer.
nano fibonacci.sub
Add the following contents:
# exit-driven-example.submit

executable = fibonacci.py
arguments = 10

checkpoint_exit_code = 85
transfer_checkpoint_files = fibonacci.checkpoint

output = fibonacci.out
error = fibonacci.err
log  = fibonacci.log

requests_cpus = 1
request_disk = 2GB
request_memory = 2GB

queue
Save the file and exit the text editor. (In nano, use CTRL+X to quit. You will be prompted to save the file before exiting.)
From the submit file above, you may have noticed a few additional lines beyond those used for a standard job:
checkpoint_exit_code = 85tells HTCondor that the program saved a checkpoint and should be placed back in the queue. Exit code85is used for all exit-driven checkpointing jobs.transfer_checkpoint_files = fibonacci.checkpointidentifies the file that will contain the job’s saved progress. Replacefibonacci.checkpointwith the name of the checkpoint file(s) created by your program.
Step 4: Submit the job
Submit the job to HTCondor:
condor_submit fibonacci.sub
The command will return a job ID that you can use to monitor the job.
Step 5: Check the job status
Use the following command to check whether the job is idle, running, or complete:
condor_watch_q
After each checkpoint, the job may briefly return to the idle state before HTCondor starts it again.
Step 6: Monitor the job
You may follow the HTCondor log while the job runs:
tail -n 100 -f fibonacci.log
The log records when HTCondor transfers files, starts the job, receives a checkpoint, and restarts the job.
You can also follow the program’s output:
tail -f fibonacci.out
Press Ctrl+C to stop following a file. This does not stop the job.
Step 7: Review the results
After the job finishes, list the files in the directory:
ls
You should see files similar to:
fibonacci.checkpoint
fibonacci.err
fibonacci.log
fibonacci.out
fibonacci.py
fibonacci.result
fibonacci.sub
View the final result:
cat fibonacci.result
You should see:
The Fibonacci number after 10 iterations is 89
You can also review:
fibonacci.outfor iteration and checkpoint messagesfibonacci.errfor errorsfibonacci.logfor HTCondor eventsfibonacci.checkpointfor the most recently saved progress
How does the script create checkpoints?
When using checkpointing for your own project, your program must include the logic needed to save and resume its work.
The Fibonacci example works because fibonacci.py checks for an existing checkpoint file when it starts, loads the saved values, updates the checkpoint file after every two iterations, and exits with code 85 so HTCondor knows to run it again.
The following parts of fibonacci.py control how the script saves and resumes its progress:
CHECKPOINT_FILENAME = 'fibonacci.checkpoint'

# Number of seconds to sleep between iterations so the job is visible in the queue
SLEEP_SECONDS = 30

# Number of outer loop iterations to complete before self-checkpointing
CHECKPOINT_FREQUENCY = 2
CHECKPOINT_FILENAMEsets the name of the file used to save progress.CHECKPOINT_FREQUENCYtells the script to create a checkpoint after every two completed iterations. The 30-second pause makes the short calculation behave more like a longer-running job.
Write a check to see if we’re starting from scratch or from a checkpoint
# Figure out where to start from
completed_iterations = 0
n_minus_2 = 0
n_minus_1 = 1
try:
    f = open(CHECKPOINT_FILENAME, 'r')
    completed_iterations = int(f.readline().rstrip())
    n_minus_2 = int(f.readline().rstrip())
    n_minus_1 = int(f.readline().rstrip())
    f.close()
except IOError:
    pass
The script first sets the values used when starting from the beginning. It then checks for an existing checkpoint file. If the file exists, the script reads the number of completed iterations and the two Fibonacci values needed to continue. If the file does not exist, the script keeps the starting values and begins with the first iteration.
    # Possibly checkpoint here
    if (completed_iterations < total_iterations) and (completed_iterations % CHECKPOINT_FREQUENCY == 0):
        print('{}: Checkpointing'.format(timestring()))
        try:
            f = open(CHECKPOINT_FILENAME, 'w')
            f.write("{}\n{}\n{}\n".format(completed_iterations, n_minus_2, n_minus_1))
            f.close()
        except IOError:
            print('Could not write checkpoint: {}'.format(IOError.strerror))
            sys.exit(2)
        sys.exit(85)
After every two iterations, the script checks whether more work remains. It then writes the number of completed iterations and the two most recent Fibonacci values to fibonacci.checkpoint. After saving the file, the script exits with code 85, which tells HTCondor to preserve the checkpoint and place the job back in the queue.
For your own project, you will need to decide what information must be saved, how often checkpoints should be created, and how your program will read the saved information when it starts again.
How does checkpointing work?
At CHTC, we recommend exit-driven checkpointing. With this method, the program saves its progress whenever it reaches the checkpoints defined in the script.
- After submitting the job(s) successfully, it runs until it reaches a checkpoint.
- The job exits on purpose with checkpoint exit code
85. - HTCondor recognizes code
85and saves the checkpoint files in a protected directory called/spool. - HTCondor places the job back in the queue to wait for another execution resource.
- When the job starts again, HTCondor transfers the checkpoint files from
/spoolback to the job. - The program reads the checkpoint files and continues from the saved point.
- This process repeats until the job finishes and exits normally with code
0.
Is my project a good fit for checkpointing?
Not every project can use checkpointing. Your software, program, or code must be able to save its progress while it runs and know how to resume from that saved progress later.
To check whether your project supports checkpointing, look at the manual or documentation for your software. Some tools may call this feature “checkpointing,” “resume,” “restart,” or “checkpoint/restart.”
If you are not sure, contact a 👨💻 Research Computing Facilitator for help deciding whether your software, program, or code can use checkpointing.
How do I set it up?
Checkpointing requires changes to both your executable script and your HTCondor submit file. Your executable script must be able to save its progress, read the saved files when it starts again, and continue from the saved point.
Make sure your executable script can checkpoint
Before updating the submit file, confirm that your executable script can:
- Save its progress to one or more checkpoint files.
- Read existing checkpoint files when it starts.
- Continue from the saved progress.
- Exit with code
85after creating a checkpoint. - Exit normally when all work is complete.
Changes to the submit file
Checkpointing requires a few additional settings beyond those used for a standard job:
checkpoint_exit_code = 85tells HTCondor that the program saved a checkpoint and should be placed back in the queue.transfer_checkpoint_fileslists the checkpoint files or directories that HTCondor must preserve between runs.
If your job is shorter than 4–6 hours, or can checkpoint at least that frequently, you can also make it eligible for additional backfill resources by adding: +is_resumable = true
+is_resumable tells HTCondor that your job can be interrupted and later resume from a saved checkpoint. This setting is optional and is not required for checkpointing.
The submit file may look like this:
# exit-driven-example.sub

executable = my_program
arguments = argument1 argument2

checkpoint_exit_code = 85
transfer_checkpoint_files = my_output.txt, temp_dir, temp_file.txt

output = example.out
error = example.err
log = example.log

request_cpus = 1
request_disk = 2GB
request_memory = 2GB

queue
Replace the example values with the executable, arguments, checkpoint files, output filenames, and resource requests used by your project.
Write a time-based wrapper script
A wrapper script can be useful when your program creates checkpoint files but does not stop on its own after saving them.
The wrapper limits how long the program runs and returns the checkpoint exit code when that time limit is reached.
The wrapper does not create checkpoint files. Your program must save its progress while it runs, and it must be able to resume from those files later. Choose a time limit that gives the program enough time to create a complete and usable checkpoint.
Create a wrapper script
Below is an example of a wrapper script that allows the program to run for up to four hours:
#!/bin/bash

timeout 4h do_science arg1 arg2

timeout_exit_status=$?

if [ $timeout_exit_status -eq 124 ]; then
    exit 85
fi

exit $timeout_exit_status
The following line sets the program’s time limit:
timeout 4h do_science arg1 arg2
This line has three main parts:
timeoutruns a command for a limited amount of time.4hsets the time limit to four hours.do_science arg1 arg2represents the program and its arguments.
Replace do_science arg1 arg2 with the command and arguments used to run your program.
You can also change the four-hour limit based on how often your program creates checkpoint files and how long it takes to save or resume its work. We recommend setting the timeout between one and five hours, with a maximum of ten hours.
Shorter timeouts give the job more opportunities to save progress and move between resources, while longer timeouts reduce the overhead of repeatedly stopping, transferring files, and restarting.
If the timeout is less than one hour, the job may spend too much time stopping, transferring files, and restarting. If the timeout is longer than ten hours, the job may have fewer opportunities to run on other campus resources or the OSPool.
The following line saves the exit code returned by the timeout command:
timeout_exit_status=$?
The Bash variable $? contains the exit code returned by the previous command. This line saves that code in a variable named timeout_exit_status.
The following section checks whether the time limit was reached:
if [ $timeout_exit_status -eq 124 ]; then
    exit 85
fi
The timeout command returns exit code 124 when the four-hour limit is reached. The wrapper changes code 124 to checkpoint exit code 85.
When HTCondor receives code 85, it preserves the files listed in transfer_checkpoint_files and places the job back in the queue.
The final line handles all other exit codes:
exit $timeout_exit_status
If the program finishes before the time limit or exits with an error, the wrapper returns the program’s original exit code. This prevents HTCondor from treating a completed or failed job as a checkpoint.
When the job starts again, HTCondor returns the saved checkpoint files so do_science can resume from its most recent saved point.
Changes to the submit file
When using a wrapper, set the wrapper script as the executable in your submit file. Because the program command and arguments are already included in this wrapper, you do not need an arguments line.
# exit-driven-example.sub

executable = my_wrapper.sh

checkpoint_exit_code = 85
transfer_checkpoint_files = my_output.txt, temp_dir, temp_file.txt

output = example.out
error = example.err
log = example.log

request_cpus = 1
request_disk = 2GB
request_memory = 2GB

queue
Replace the example values with the files, commands, and resource requests used by your project. This includes the executable, program arguments, checkpoint files, output filenames, and requested computing resources.
How do I check the progress of my checkpointing job(s)?
Always test a single checkpointing job before scaling up to identify odd or unintentional behaviors in your analysis.
To determine if your job is successfully creating and saving checkpoint files, you can investigate checkpoint files once they have been transferred to /spool.
-
Navigate to
/var/lib/condor/spool.[user@ap2002 ~]$ cd /var/lib/condor/spool [user@ap2002 spool]$ ls -p 1084/ 2340/ 3913/ 549/ 7633/ 7683/ 7694/ 800/ checkpoint-cleanup/ schedd_daemon_history 1572/ 2369/ 3914/ 550/ 7676/ 7684/ 7695/ 8353/ epoch_history schedd_daemon_history.20260728T215929 1968/ 2406/ 4138/ 586/ 7677/ 7685/ 7696/ 8455/ history spool_version 2018/ 2544/ 4251/ 6069/ 7678/ 7686/ 7697/ 8510/ library.db 2325/ 2829/ 4253/ 6130/ 7679/ 7687/ 7698/ 8566/ library.db-shm 2327/ 2997/ 4624/ 6854/ 7680/ 7688/ 7699/ 9019/ library.db-wal 2336/ 3231/ 538/ 7550/ 7681/ 7689/ 7700/ 9463/ local_univ_execute/ 2338/ 3610/ 546/ 7591/ 7682/ 7693/ 7701/ 9592/ lost+found/The directories in this folder are the last four digits of a job’s cluster ID with leading zeros removed. Sub folders are labeled with the process ID for each job.
-
To investigate the checkpoint files, look at your job’s ID and navigate to the correct directory.
For example, for
17870068.220, navigate to the directory68in a subdirectory called220.[user@ap2002 spool]$ cd 68 [user@ap2002 68]$ cd 220
Run a test by evicting your job
It is also possible to intentionally evict a running job and have it rematch to an execute server to test if your code is successfully resuming from checkpoint files or not.
- To test this, use
condor_vacate_job <JobID>. This command will evict your job intentionally and have it return to “Idle” state in the queue. - This job will begin running once it rematches to an execute server, allowing you to test if your job is correctly resuming from checkpoint files or incorrectly starting over with the analysis.
Related pages
For more information about checkpointing HTCondor jobs, see HTCondor’s manual Self-Checkpointing Applications.